Control panel lights reference
The control panel lights indicate status and are useful for diagnosing printing problems.
This section contains information about the lights, what they indicate, and what action
to take if necessary.
For more information about the printer control panel, see Use the printer control panel.
2
1
3
4
12
5
6
7
9
11
8
10
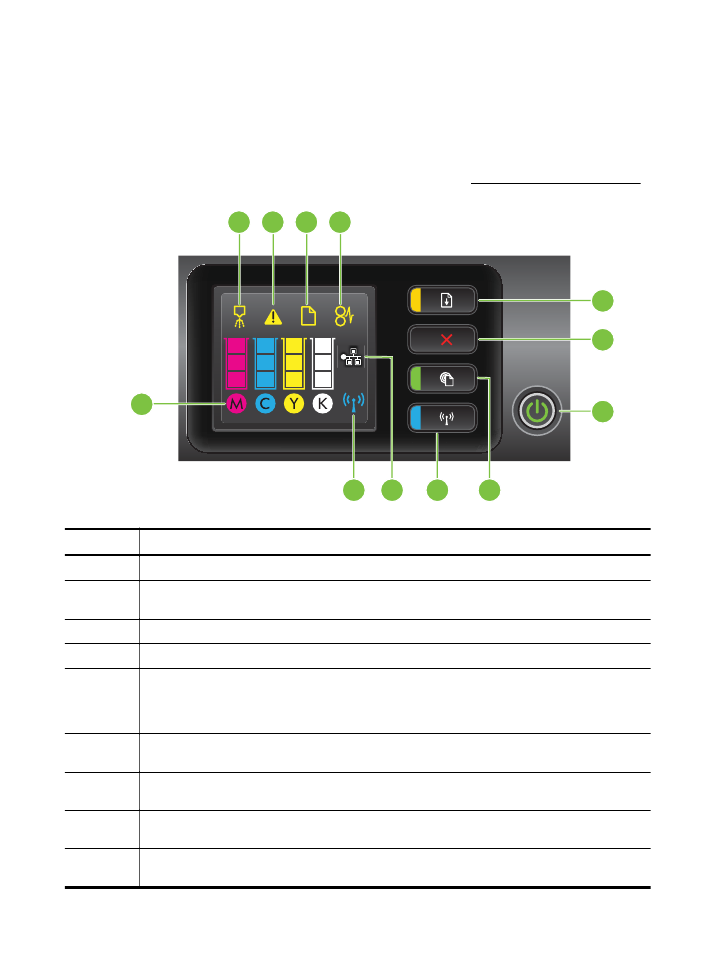
Label
Name and Description
1
Printhead align icon. Shows that the printhead requires alignment.
2
Ink cartridge access door open icon. Shows that the printer's ink cartridge access door or
top cover is open.
3
Out of paper icon. Shows that the printer is out of paper.
4
Paper jam icon. Shows that the printer has a paper jam.
5
Resume button and light. The Resume light blinks when the button must be pressed to
resume printing. Press to continue a print job after clearing a paper jam, adding paper, or
installing a cartridge. Press to cancel a print job when a media size mismatch occurs. Press
and hold for three seconds to print a demo page.
6
Cancel button. Press once to stop a print job, or press and hold for three seconds to print a
printer status report.
7
Power button and light. Press to turn the printer on or off. The light indicates whether the
printer is on or off.
8
HP ePrint button and light. Press to turn on the HP ePrint function and print an information
page. The light indicates whether the printer is connected to an HP ePrint server.
9
Wireless button and light. Press to turn the 802.11 wireless feature on or off. The button
lights when the wireless feature is on.
Control panel lights reference
81
Label
Name and Description
10
Ethernet network icon. Shows that an Ethernet network connection exists.
11
Wireless network icon. Shows that a wireless network connection exists.
12
Ink cartridge information icons. Displays ink cartridge information, including fill levels.
NOTE: Ink level warnings and indicators provide estimates for planning purposes only.
When you receive a low on ink message, consider having a replacement cartridge available
to avoid possible printing delays. You do not need to replace cartridges until prompted to do
so.
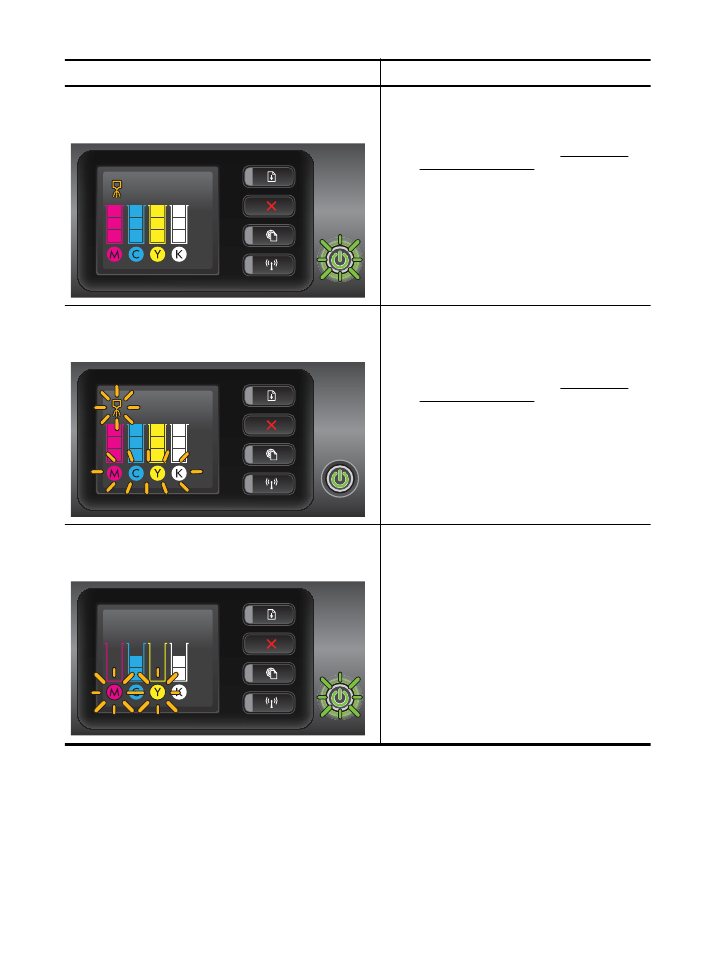
Interpreting control panel lights
Light description/Light pattern
Explanation and recommended action
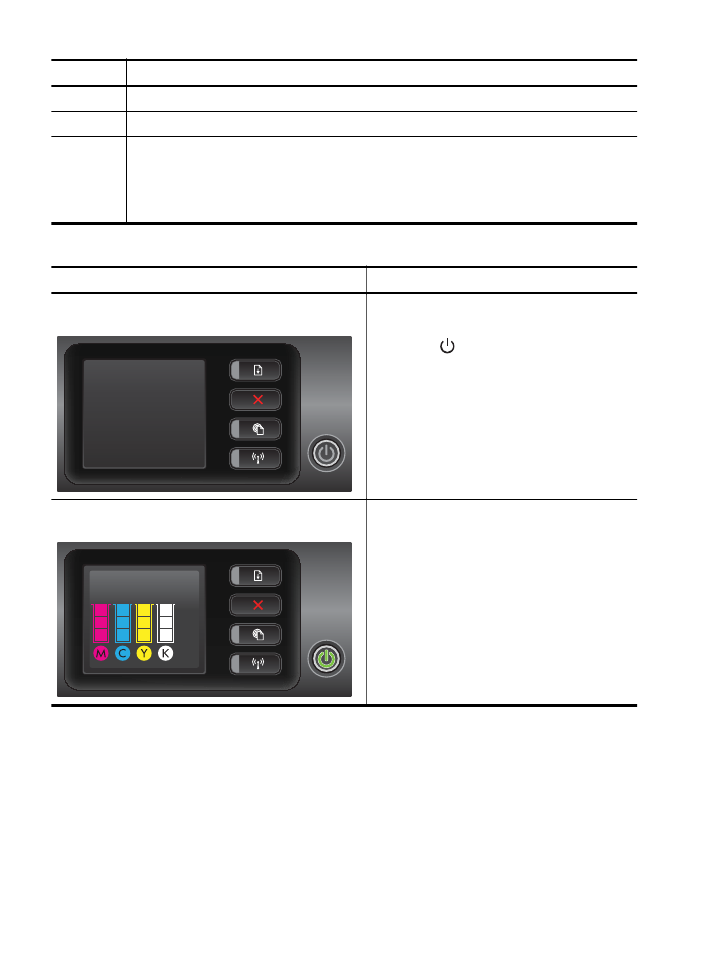
All lights are off.
The printer is off.
•
Connect the power cable.
•
Press
(Power) button.
The Power light is on.
The printer is ready.
No action is required.
Chapter 5
(continued)
82
Solve a problem
Light description/Light pattern
Explanation and recommended action
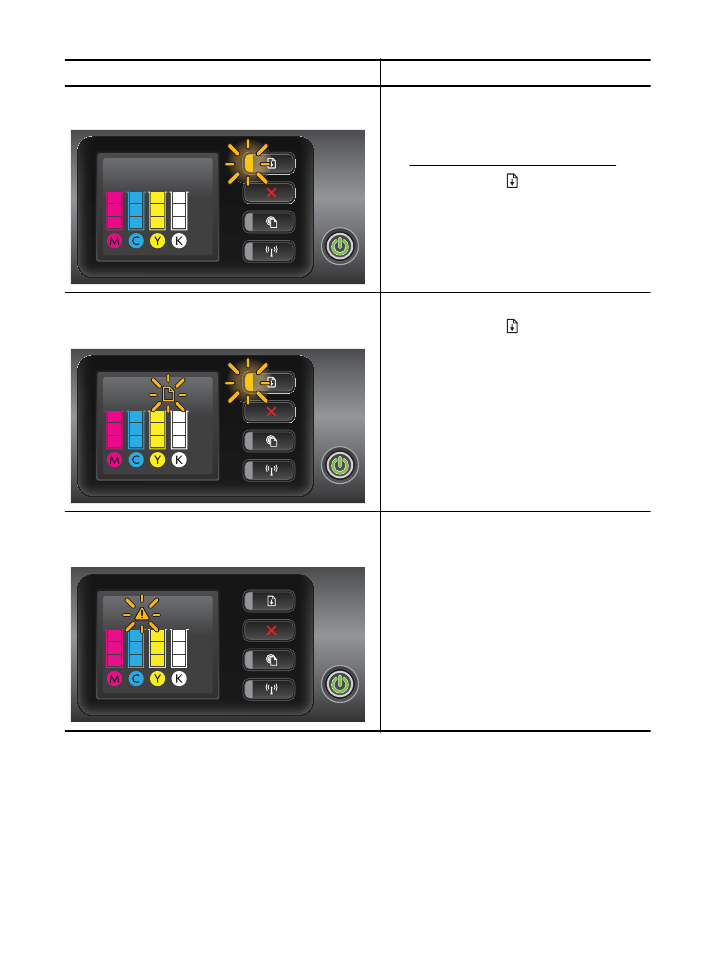
The Power light is on and the Resume light blinks.
The media width setting does not match the
media loaded.
Change the media setting in the print driver to
match the media loaded. For more information,
see Print on special and custom-size paper.
Load paper and press (Resume) button to
cancel.
Print the document again.
The Power light is on, the Out of Paper icon blinks, and
the Resume light blinks.
The printer is out of paper.
Load paper and press (Resume) button.
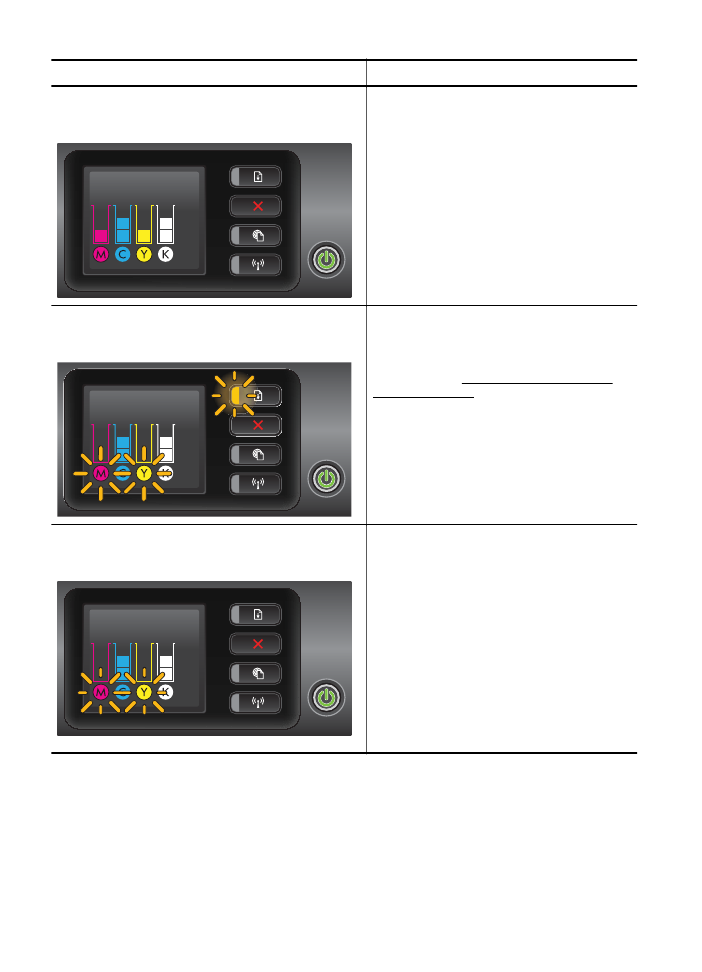
The Power light is on, and the Access Door Open icon
blinks.
The access door or top cover is not closed
completely.
Make sure the access door and top cover are
completely closed.
(continued)
Control panel lights reference
83
Light description/Light pattern
Explanation and recommended action
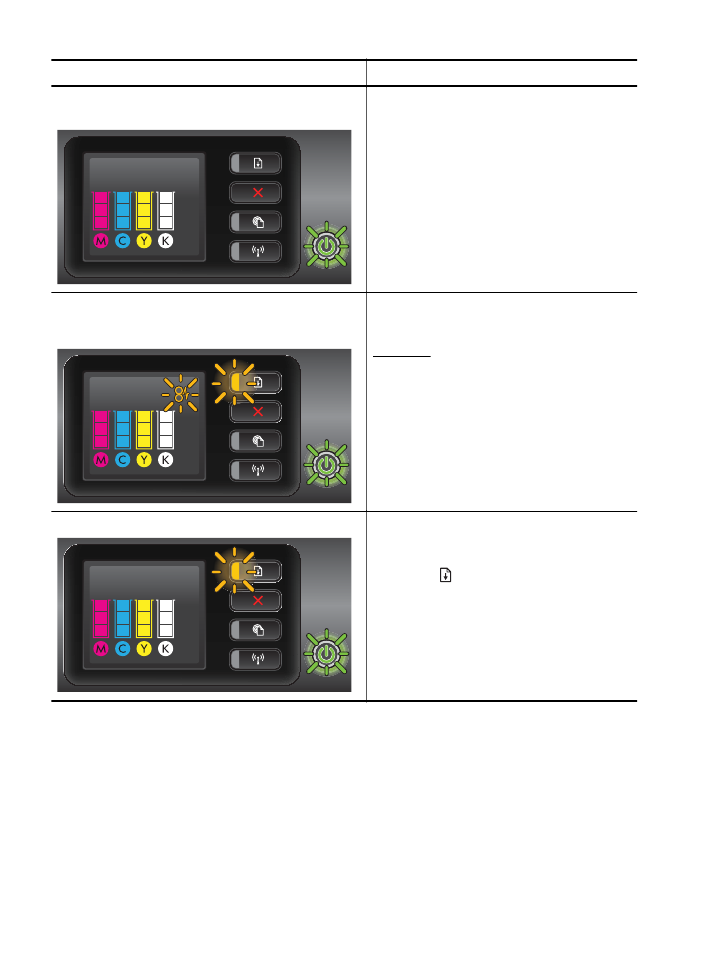
The Power light blinks.
The printer is turning on or off, or is processing
a print job.
No action is required.
The printer is pausing for the ink to dry.
Wait for the ink to dry.
The Power light, the Paper Jam icon, and the Resume
light blink.
Print media is jammed in the printer.
Remove all media from the output tray. Locate
and clear the jam. For more information, see
Clear jams.
The Power light and the Resume light blink.
The printer carriage has stalled.
•
Open the top cover and remove any
obstructions (such as jammed media).
•
Press (Resume) button to continue
printing.
•
If the error persists, turn the printer off,
and then on again.
Chapter 5
(continued)
84
Solve a problem
Light description/Light pattern
Explanation and recommended action
The Power light blinks and the Printhead Alert icon is
on.
The printhead is incompatible.
•
Ensure the printhead is properly installed.
•
If the error persists, replace the printhead.
For more information, see Remove and
reinstall the printhead.
The Power light is on, the Printhead Alert icon blinks,
and all ink cartridge icons blink.
The printhead is missing, not installed properly,
or damaged.
•
Ensure the printhead is properly installed.
•
If the error persists, replace the printhead.
For more information, see Remove and
reinstall the printhead.
The Power light and one or more of the ink cartridge
lights blink.
One or more of the ink cartridges need
attention, or are damaged or incompatible.
•
Ensure the indicated ink cartridge is
properly installed, and then try to print.
Remove and reinsert the ink cartridge a
few times if necessary.
•
If the error persists, replace the indicated
ink cartridge.
(continued)
Control panel lights reference
85
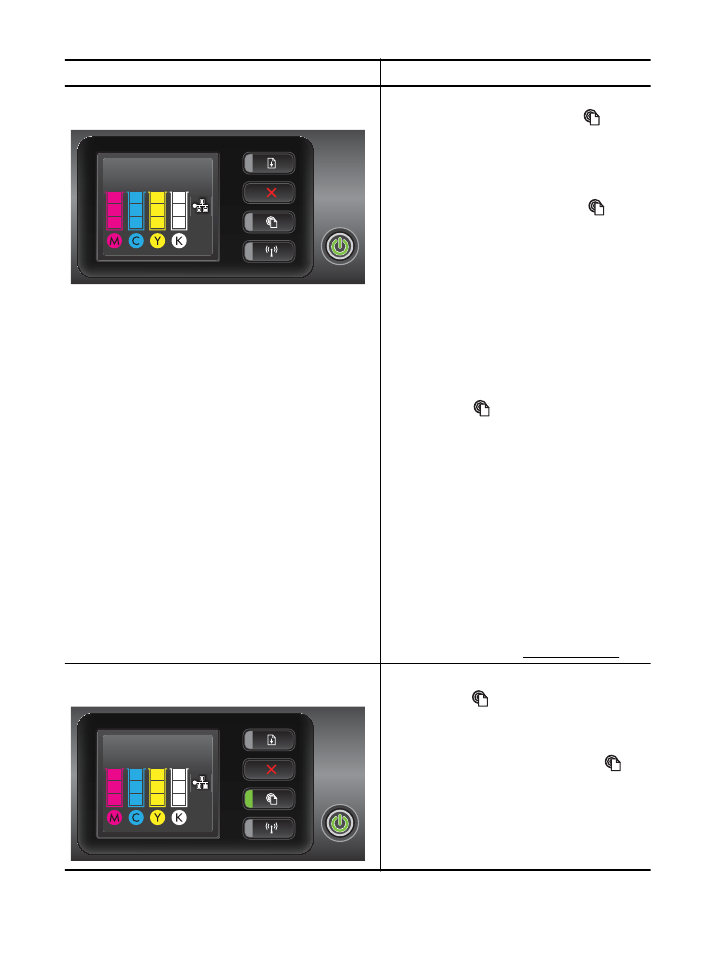
Light description/Light pattern
Explanation and recommended action
The Power light is on; and for one or more ink cartridge
lights, only one segment of the ink indicator is on.
One or more of the ink cartridges are low on ink
and will need to be replaced soon.
Get new ink cartridges and replace the existing
cartridges when prompted to do so.
NOTE: Ink level alerts and indicators provide
estimates for planning purposes only. When you
receive a low on ink message, consider having
a replacement cartridge available to avoid
possible printing delays.
The Power light is on, the Resume light blinks, and one
or more ink cartridge icons blink.
The original HP ink in one or more cartridges
has been depleted.
If they were sold to you as new, original HP
cartridges, they might be counterfeit. For more
information, see Used, Refilled or Counterfeit
Cartridge Detected.
The Power light is on, and one or more ink cartridge
icons blink.
•
One or more ink cartridges must be
replaced to resume printing.
Get new ink cartridges and replace the
existing cartridges when prompted to do
so.
•
One or more of the ink cartridges are
missing or incorrect.
Install the indicated ink cartridge, and then
try to print. Remove and reinsert the ink
cartridge a few times if necessary.
NOTE: Ink level alerts and indicators provide
estimates for planning purposes only. When you
receive a low on ink message, consider having
a replacement cartridge available to avoid
possible printing delays.
Chapter 5
(continued)
86
Solve a problem
Light description/Light pattern
Explanation and recommended action
The HP ePrint light is off.
•
HP ePrint has not been set up.
To set up HP ePrint, press the
(HP
ePrint) button, and then follow the
instructions on the information page that
prints.
•
HP ePrint has been set up but has been
turned off.
To turn on HP ePrint, press the
(HP
ePrint) button.
•
HP ePrint is turned on but is unable to
connect.
HP ePrint is unable to connect, possibly
because the server is unavailable or the
network is not functioning properly.
If your network uses proxy settings when
connecting to the Internet, make sure the
proxy settings you are entering are valid.
For more information, see the getting
started guide provided with the printer or
check with the IT administrator or person
who set up your network.
Press the
(HP ePrint) button to try
connecting again.
◦
If the printer can connect, the HP
ePrint light turns on, and the printer
prints an information page.
◦
If the printer still cannot connect,
the HP ePrint light blinks and then
turns off.
•
HP ePrint has been set up but has been
turned off because the printer has not
been updated.
If a mandatory update for the printer is
available but has not been installed, HP
ePrint is turned off. After the update has
been installed, HP ePrint turns on
automatically.
For more information about installing the
printer update, see Update the printer.
The HP ePrint light is on.
HP ePrint is turned on.
If you press the
(HP ePrint) button once, the
printer prints an information page which
provides some instructions on setting up HP
ePrint.
To turn off HP ePrint, press and hold the
(HP
ePrint) button. The light blinks for five seconds
before turning off.
(continued)
Control panel lights reference
87
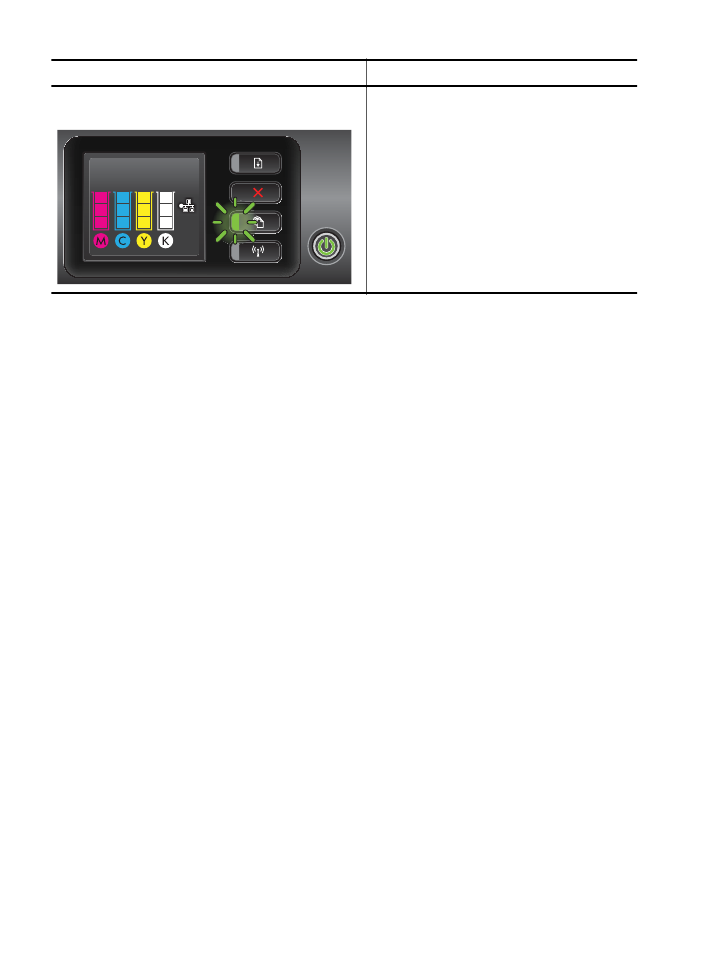
Light description/Light pattern
Explanation and recommended action
The HP ePrint light blinks.
HP ePrint is trying to connect.
The HP ePrint light blinks when you turn on or
turn off HP ePrint.
If HP ePrint is able to connect successfully, the
light blinks and then turns on. If HP ePrint
cannot connect, the light blinks and then turns
off.
Chapter 5
(continued)
88
Solve a problem

A